A site is a set of resources installed under the same administrative domain, used to submit, manage and execute jobs. A site is composed by a Peer, Brokers and Workers, and it shares resources with others sites. Moreover, you can connect several sites with a Discovery Service. To read more about the OurGrid architecture, go to the Overview page.


Preparing to install


XMPP Server


Peer


Worker


Discovery Service


Broker


Preparing to install top


Setting up the environment


The OurGrid middleware requires Java Runtime Enviroment 1.6 or later.

  • To check the Java version installed on your system, type in a terminal console the following command:

    $ java -version

  • If Java is installed, this command will prompt the Java version. If the machine does not have the JRE 1.6 (or later) installed, you must install it.


XMPP Server top


Since version 4.0, OurGrid uses a new communication infrastructure, called Commune that it is built on top of XMPP (Extensivel Messaging and Presence Protocol). Thus, every communication between OurGrid components is intermediated by an XMPP server.

OurGrid components are certified to work with the Jabber server (ejabberd), in order to install ejabberd see the Ejabberd Installation section.


Peer top


The Peer is the manager of an OurGrid site. This component is responsible for managing the resources of the site, requesting resources from other sites to local clients and donating local resources to other Peers.


Linux Debian-based (.deb)


  • Installation via terminal console


    1. Add the following OurGrid repository to your sources list:
      deb http://packages.lsd.ufcg.edu.br/apt stable main
    2. Open a terminal console and execute the following command:
      $ sudo apt-get install ourgrid-peer
    3. And you will be prompted to define some parameters like:

      Parameter Description
      XMPP Username The username used to login to the XMPP Server. By default this parameter uses the hostname of the machine.
      XMPP Servername The XMPP server address. If you want use the OurGrid XMPP server, let this parameter with default value xmpp.ourgrid.org.
      XMPP Password The password of the XMPP account.
    4. After it, the installation process will be finished.


  • Installation via package manager (Synaptic)


    1. Add the following OurGrid repository to your sources list:
      deb http://packages.lsd.ufcg.edu.br/apt stable main
    2. Open the Synaptic.
    3. Search for ourgrid-peer.
    4. Mark it for install.
    5. The installation will prompt you for the same parameters listed in the previous section.
    6. After it, the installation process will be finished.

  • Installation via .deb package


    1. Go to the download page and get the OurGrid Peer .deb package
    2. You have two ways to install the package:
      • In a terminal console execute the command: $ sudo dpkg -i <<deb package>>, or
      • Search the package on the Nautilus file explorer and execute it with a double-click
    3. The installation will prompt you for the same parameters listed in the previous section.
    4. After it, the installation process will be finished.

    Info You can modify the configuration of each OurGrid component by using the propierties files. To learn more about the properties files see Configuration Properties section.


Linux Red Hat-based (.rpm)


  • Installation via .rpm package


    1. Go to the download page and get the OurGrid Peer .rpm package
    2. You have two ways to install the package:
      • In a terminal console execute the command: $ sudo rpm -i --force <<rpm package>>, or
      • Find the .rpm file and double click to install
    3. After the installation is done, you can change the Peer's properties at /etc/ourgrid/peer/peer.properties

    Info You can modify the configuration of each OurGrid component by using the propierties files. To learn more about the properties files see Configuration Properties section.


    Microsoft Windows


    1. Download OurGrid Peer installer for Windows in the Download section.
    2. Run the installer.
    3. And you will be prompted to define some parameters like:

      Parameter Description
      XMPP Username The username used to login to the XMPP Server. By default this parameter uses the hostname of the machine.
      XMPP Servername The XMPP server address. If you want use the OurGrid XMPP server, let this parameter with default value xmpp.ourgrid.org.
      XMPP Password The password of the XMPP account.
    4. After it, the installation process will be finished. After the installation, go to Start -> All Programs -> OurGrid -> Peer and click in the "start" link in the Peer GUI.

    Info You can modify the configuration of each OurGrid component by using the propierties files. To learn more about the properties files see Configuration Properties section.


    Other operating systems


    1. Download the zip version of the OurGrid Peer here.
    2. Unpack the downloaded package.
    3. The resulting unpacked tree looks like this:
      • certification/ - Stores X.509 certificates
      • lib/ - Jars
      • COPYING - License file
      • COPYING.LESSER - License file
      • peer - Unix script
      • peer.bat - Windows script
      • peer.poperties - Peer configuration
      • testjvm - Unix script used to find Java
    4. You can use the Peer Console or the Peer GUI. In order to run the Peer GUI, double click the peer.bat file (Windows) or type 'bash peer gui' (Linux). You will see a GUI like this:


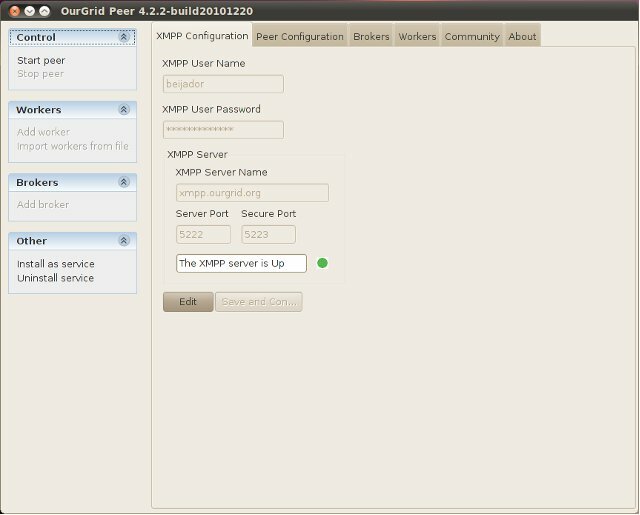
      Figure 1 Screenshot of the Peer's GUI XMPP configuration tab.

    The GUI automatically suggests the XMPP user name, password and server name. You may change the user name to the name of your peer. If you are using other XMPP server (for example, if you have installed one in your site), change the server name property.

    ImportantThe server name must match the exact address set in the Openfire's xmpp.domain property. To view the value of this property, open the Openfire admin console and go to Server > Server Manager > System properties > xmpp.domain

    The XMPP server can be configured to create an account on its first login. In this case, if the account does not exist, it will be created in that XMPP server with the user name and password you chose. You can test your connection by clicking at the "Test Connection" button. Remember, if the server has on demand registration available, this test will automatically create your XMPP account. If your connection fails, follow these steps:

    • Verify if the XMPP server is UP;
    • Create the user account or allow the server to create it automatically;
    • Test the connection again;

    After changing the Peer's properties, click the "Save" button to store the values in the peer.properties file. The next time you run the Peer GUI, the new values will be shown. Now you are ready to start the Peer component itself. So, click at the "Start peer" link. When the Peer is started successfully, the "Start peer" link will be disabled and the "Stop peer" link will be enabled.

    If you choose to run the Peer via console, you must open the peer.properties file to edit the XMPP properties. You must define the commune.xmpp.username, commune.xmpp.servername and commune.xmpp.password properties. Now you can start the peer agent, typing 'bash peer start' in the console. The peer will prompt the success message or the error cause. You may need to use the 'chmod +x peer' command, to enable the execution of the peer script.


    Important After install the OurGrid Peer, click here to check how to connect the Peer to the OurGrid Community


    Worker top


    The Worker is the OurGrid component that receives remote tasks submitted by grid users. These tasks are run by the Executor module. As a site administrator, you should prevent your machines from malicious grid users. So, you should define an Executor that meets your security requirements. If you trust all the grid users (for example, in a private community), you can use the Executors that run the tasks directly in the Operational System (Linux or Windows). However, if you do not trust the grid users, you should use an Executor with Virtualization. So, in this case the tasks run inside a virtual machine without network access. This is a very secure option, because a malicious task can damage the virtual machine, but its state is reset every time a worker is allocated.

    There are two options of virtualized Executors:

    • VServer - Linux
    • Worker VBox - Windows and Linux (requires VirtualBox 4.1.16 or newer)

    Important Before start to install the Worker, you need to install the virtualization environment chosen by you.


    Linux Debian-based (.deb)


    Available Packages
    Worker without Virtualization - ourgrid-worker
    Worker QEMU - ourgrid-worker-qemu


    1. You have three ways to install the package chosen by you:

      Installation via terminal console


      Add the following OurGrid repository to your sources list: deb http://packages.lsd.ufcg.edu.br/apt stable main
      Open a terminal console and execute the command: $ sudo apt-get install ourgrid-worker


      Installation via package manager (Synaptic)


      Or add the following OurGrid repository to your sources list: deb http://packages.lsd.ufcg.edu.br/apt stable main
      Open the package manager Synaptic and search for the chosen package.


      Installation via .deb package


      Or go to the download page and get the OurGrid Worker .deb package
      You have two ways to install the package:

      • In a terminal console execute the command: $ sudo dpkg -i <<deb package>>, or
      • Search the package on the Nautilus file explorer and execute it with a double-click

    2. The installation process will prompt you for the following information:

      Option Description
      How many workers do you want to install?

      By default, this option recommends a number based on your number of processors, but you can choose less than it.

      XMPP Username The username used to login to the XMPP Server. By default this parameter uses the hostname of the machine.
      XMPP Servername The XMPP server address. If you want use the OurGrid XMPP server, let this parameter with default value xmpp.ourgrid.org.
      XMPP Password The password of the XMPP account.
      Peer Address

      The username and server to used by Peer that you want to connect (example: ).

      Activate Idleness Detector

      Define if the Worker will check if the machine is idle before start to donate the resource. Set Yes or No to use the idleness detector.

      Idleness detector time

      Define how much time idle the machine need to stay before the worker set it to available. The time is set in seconds. Example: 1200 (20 minutes).

    3. After the installation, to be able to log into the Peer, you need to sign the Worker certificate by Peer. The certificate is used to verify the identity of the connected Worker.
      You can sign the worker certificate in one of the followng ways:
      • Via a terminal console
        1. Copy the Worker certificate, located in the “certification/mycertificate” directory into the worker directory, to the machine where the Peer was installed
        2. In the Peer machine, open a console and type the command:
          $ peer signcertificate {source} {destination}
          - where source is the Worker certificate and destination is where the signed certificate must be stored.
        3. Copy back the signed certificate and replace it into the Worker directory
        4. Finally, the Worker can be started and logged in the Peer.
      • Via the Peer user's GUI

        1. Copy the certificate of the worker to the machine with the peer.
        2. In the GUI, click "Issue certificate".
        3. Select the certificate that you copied and select the destination.
        4. Issue the certificate.
        5. Copy the issued certificate back to the worker replacing the old certificate.
    4. After it, the installation process will be finished.

    Info Custom attributes: Click here to see how to define custom attributes in the Worker for use as job requirements


    Linux Red Hat-based (.rpm)


  • Installation by .rpm package


    1. Go to the download page and get the OurGrid Worker .rpm package
    2. You have two ways to install the package:
      • In a terminal console execute the command: $ sudo rpm -i --force <<rpm package>>, or
      • Find the .rpm file and double click to install
    3. This installation will get the amount of processor your machine have and install the same amount of workers
      • Each worker will have its own folder at /etc/ourgrid/
    4. After the installation, to be able to log into the Peer, you need to sign the Worker certificate by Peer. The certificate is used to verify the identity of the connected Worker.
      You can sign the worker certificate in one of the followng ways:
      • Via a terminal console
        1. Copy the Worker certificate, located in the “certification/mycertificate” directory into the worker directory, to the machine where the Peer was installed
        2. In the Peer machine, open a console and type the command:
          $ peer signcertifcate {source} {destination}
          - where source is the Worker certificate and destination is where the signed certificate must be stored.
        3. Copy back the signed certificate and replace it into the Worker directory
        4. Finally, the Worker can be started and logged in the Peer.
      • Via the Peer user's GUI

        1. Copy the certificate of the worker to the machine with the peer.
        2. In the GUI, click "Issue certificate".
        3. Select the certificate that you copied and select the destination.
        4. Issue the certificate.
        5. Copy the issued certificate back to the worker replacing the old certificate.
    5. After the installation is done, you can change the properties at /etc/ourgrid/worker$WORKER_NUMBER/worker.properties

    Info Custom attributes: Click here to see how to define custom attributes in the Worker for use as job requirements


    Info You can modify the configuration of every OurGrid component by using the properties files. To learn more about the properties files see the Configuration Properties section.


    Microsoft Windows


    1. Download the OurGrid Worker VBox installer for Windows available in the Download section.

    2. Run the installer by double-clicking it from your desktop environment.

    3. The installation process will prompt you for the following information:

      Option Description
      XMPP Username The username used to login to the XMPP Server. By default this parameter uses the hostname of the machine.
      XMPP Servername The XMPP server address. If you want use the OurGrid XMPP server, let this parameter with default value xmpp.ourgrid.org.
      XMPP Password The password of the XMPP account.
      Peer Username

      The username used by Peer that you want to connect (example: peer-lsd).

      Peer Servername

      The servername used by the Peer that you want to connect (example: xmpp.ourgrid.org).

    4. After the installation, to be able to log into the Peer, you need to sign the Worker certificate by Peer. The certificate is used to verify the identity of the connected Worker.
      • You can sign the worker certificate via the Peer user's GUI:

        1. Copy the certificate of the worker to the machine with the peer.
        2. In the GUI, click "Issue certificate".
        3. Select the certificate that you copied and select the destination.
        4. Issue the certificate.
        5. Copy the issued certificate back to the worker replacing the old certificate.
    5. After it, the installation process will be finished.

    Info Custom attributes: Click here to see how to define custom attributes in the Worker for use as job requirements


    MacOS


    1. Download the OurGrid Worker installer for MacOS available in the Download section.

    2. Run the installer by double-clicking in the pkg file. The installer will configure the worker and download the VM image.

    3. You can edit the worker configuration by editing the properties file located at /Applications/OurGrid.app/etc/ourgrid/worker.properties:

    4. After the installation, to be able to log into the Peer, you need to sign the Worker certificate by Peer. The certificate is used to verify the identity of the connected Worker.
      • You can sign the worker certificate via the Peer user's GUI:

        1. Copy the certificate of the worker to the machine with the peer.
        2. In the GUI, click "Issue certificate".
        3. Select the certificate that you copied and select the destination.
        4. Issue the certificate.
        5. Copy the issued certificate back to the worker replacing the old certificate.
    5. After it, the installation process will be finished.

    Info Custom attributes: Click here to see how to define custom attributes in the Worker for use as job requirements


    Other operating systems


    Coming soon...


    Discovery Service top


    Linux Debian-based (.deb)


    1. You have three ways to install the Discovery Service:

      Installation via terminal console


      Add the following OurGrid repository to your sources list: deb http://packages.lsd.ufcg.edu.br/apt stable main
      Open a terminal console and execute the command: $ sudo apt-get install ourgrid-ds


      Installation via package manager (Synaptic)


      Or add the following OurGrid repository to your sources list: deb http://packages.lsd.ufcg.edu.br/apt stable main
      Open the package manager Synaptic and search for the package ourgrid-ds.


      Installation via .deb package


      Or go to the download page and get the OurGrid DS .deb package
      You have two ways to install the package:

      • In a terminal console execute the command: $ sudo dpkg -i <<deb package>>, or
      • Search the package on the Nautilus file explorer and execute it with a double-click

    2. The installation process will prompt you for the following information:

      Option Description
      XMPP Username The username used to login to the XMPP Server. By default this parameter uses the hostname of the machine.
      XMPP Servername The XMPP server address. If you want use the OurGrid XMPP server, let this parameter with default value xmpp.ourgrid.org.
      XMPP Password The password of the XMPP account.
    3. After it, the installation process will be finished.

    Linux Red Hat-based (.rpm)


  • Installation by .rpm package


    1. Go to the download page and get the OurGrid DS .rpm package
    2. You have two ways to install the package:
      • In a terminal console execute the command: $ sudo rpm -i --force <<rpm package>>, or
      • Find the .rpm file and double click to install
    3. After the installation is done, you can change the properties at /etc/ourgrid/ds/ds.properties

    Info You can modify the configuration of each OurGrid component by using the propierties files. To learn more about the properties files see Configuration Properties section.


    Other operating systems


    1. Download the zip version of Discovery Service here.
    2. Unpack the downloaded package.
    3. The resulted unpacked tree looks like this:
      • lib/ - Jars
      • COPYING - License file
      • COPYING.LESSER - License file
      • ds - Unix script
      • ds.bat - Windows script
      • ds.properties - Discovery Service properties
      • testjvm - Unix script used to find Java
    4. You can use the Discovery Service Console. In order to run the DS Console, double click the ds.bat file (Windows) or type 'ds start' (Linux).
    5. You must open the ds.properties file to edit the XMPP properties. You must define the commune.xmpp.servername, ds.network (username@servername) and commune.xmpp.password properties. Now you can start the Discovery Service agent, typing 'ds start' in the console. The DS will prompt the success message or the error cause.
    6. To verify the peers list connected to the Discovery Service, type 'ds status'.


    Broker top


    The Broker component is responsible for submitting jobs to an OurGrid site. It must be connected to a Peer so it can request workers.

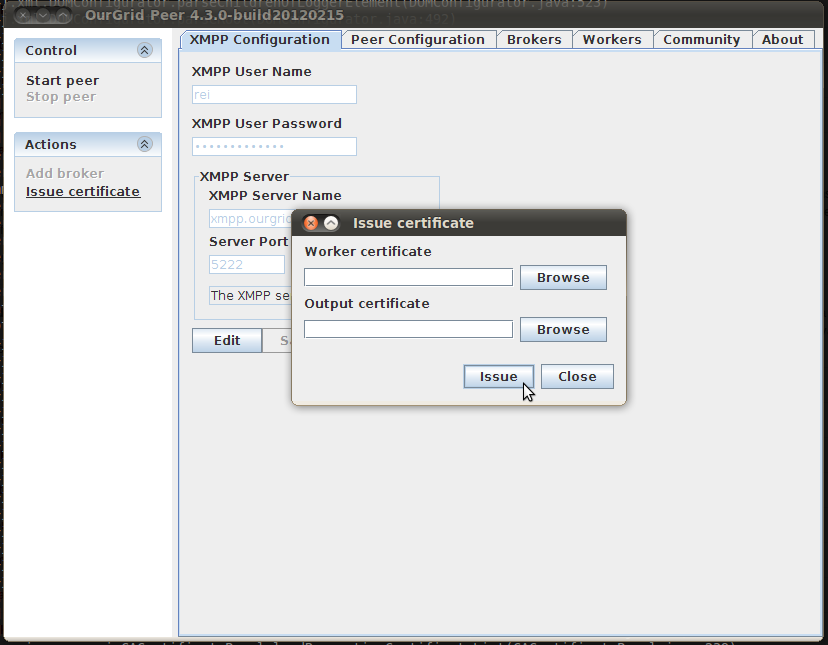
    Info Before starting a Broker, it's XMPP account should also be registered in the Peer. In the Peer GUI, there is an “Add broker” link, which opens a window with the necessary user data: user name and server name. In the console you can use o addbroker command:

    $ peer addbroker username@servername password


    Linux Debian-based (.deb)


    1. You have three ways to install the OurGrid Broker:

      Installation via terminal console


      Add the following OurGrid repository to your sources list: deb http://packages.lsd.ufcg.edu.br/apt stable main
      Open a terminal console and execute the command: $ sudo apt-get install ourgrid-broker


      Installation via package manager (Synaptic)


      Or add the following OurGrid repository to your sources list: deb http://packages.lsd.ufcg.edu.br/apt stable main
      Open the package manager Synaptic and search for the package ourgrid-broker.


      Installation via .deb package


      Or go to the download page and get the OurGrid Broker .deb package
      You have two ways to install the package:

      • In a terminal console execute the command: $ sudo dpkg -i <<deb package>>, or
      • Search the package on the Nautilus file explorer and execute it with a double-click

    2. The installation process will prompt you for the following information:

      Option Description
      XMPP Username The username used to login to the XMPP Server. By default this parameter uses the hostname of the machine.
      XMPP Servername The XMPP server address. If you want use the OurGrid XMPP server, let this parameter with default value xmpp.ourgrid.org.
      XMPP Password The password of the XMPP account.
      Broker Peer Address

      The address of Peer which the Broker must connect.

    3. After it, the installation process will be finished.

    Linux Red Hat-based (.rpm)


    1. Go to the download page and get the OurGrid Broker .rpm package
    2. You have two ways to install the package:
      • In a terminal console execute the command: $ sudo rpm -i --force <<rpm package>>, or
      • Find the .rpm file and double click to install
    3. After the installation is done, you can change the properties at <<user's home dir>>/.broker/broker.properties

    Info You can modify the configuration of each OurGrid component by using the propierties files. To learn more about the properties files see Configuration Properties section.


    Microsoft Windows (.exe)


    1. Download and execute the OurGrid Broker installer for Windows available in the Download section.
    2. The installation process will prompt you for the following information:

      Parameter Description
      XMPP Username The username used to login to the XMPP Server. By default this parameter uses the hostname of the machine.
      XMPP Servername The XMPP server address. If you want use the OurGrid XMPP server, let this parameter with default value xmpp.ourgrid.org.
      XMPP Password The password of the XMPP account.
      Peer Username

      The username used by Peer that you want to connect (example: peer-lsd).

      Peer Servername

      The servername used by the Peer that you want to connect (example: xmpp.ourgrid.org).

    3. After the installation, go to Start -> All Programs -> OurGrid -> Broker and click in the "start" link in the Broker GUI.


      Other operating systems


      1. Download the zip version of the OurGrid Broker here.
      2. Unpack the downloaded package.
      3. Go to the 'broker' directory and type $ broker gui. This command will open the Broker GUI.
      4. The Broker configuration data will be stored in the broker.properties file, that is located in:
        • $USER_HOME\.broker
      5. After defining the XMPP user name, server name, password and peer address, in the Broker GUI or directly editing the broker.properties file, you can start the Broker, clicking in the 'Start' link of the GUI or using the command:
        $ bash broker start

      Info You may need to use the 'chmod +x broker' command, to enable the execution of the broker script.